How to create a WhatsApp echo bot using Green-API in Zapier#
Zapier — is an intuitive business process automation tool that allows you to connect various web applications such as Discord, Slack, and Gmail with WhatsApp
In this tutorial, we will introduce the process of creating an echo bot for WhatsApp that will automatically reply to messages received. This bot is implemented using Zapier tools and GREEN-API.
To create an echo bot using Zapier, you will need to:
-
Create an account in Zapier and automated Zap process
-
Create an instance in your console and authorize it
-
Enable incoming notifications in instance settings
-
Setup to receiving and sending messages in Zap
Table of contents#
- Setup Zapier
- Create and configure an instance
- Create a WhatsApp echo bot
- Launch and test the echo bot
1. Setup Zapier#
Go to the Zapier sign-up page and enter your details to register.

Once registered, please confirm your email address, then run the automation you created.
2. Create and configure an instance#
To start working with Green-API, you need to register and get idInstance and apiTokenInstance in your console.
An instance is an individual gateway number that allows you to send and receive messages via WhatsApp. It is created on your console and is used to work with WhatsApp API webhook.
We recommend that you pay attention to our free Developer plan. This plan takes all of your testing and development needs.
To send messages, you must first authorize the instance. To do this, go to the instance page in your console and get a QR code to link devices. Then, in the WhatsApp or WhatsApp Business mobile app, go to the "Linked devices" section and scan the received QR code. After that, your instance will be authorized.

You use the instance data later. To receive incoming messages, go to set up incoming notifications. Click the "Edit" button on the instance page, and enable the "Receive notifications about incoming messages and files" setting. In the "Notification sending address (URL)" field, insert the address that will generated in the next step when setting up Webhook in Zapier.
3. Create a WhatsApp echo bot#
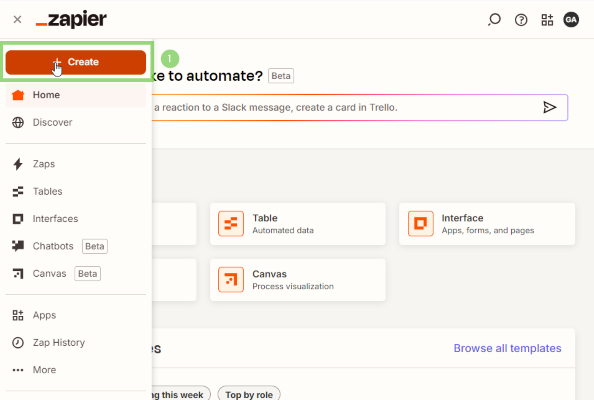
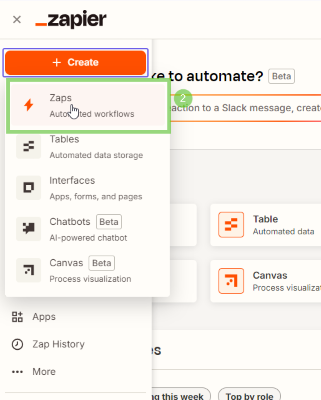
Automations in Zapier are written using Zap. Let's create a new Zap on the main page.
<center>{.framed width="450"}{.framed}</center>
The main workspace is used to create and edit actions and automation triggers. First, set up a trigger, the event from which to launch the automation. In our case, the trigger will be triggered upon receipt of an incoming message.
In this guide, WebHook will be used to receive notifications. All ways to receive notifications in Zapier are described in the article Setup incoming notifications in Zapier.
The trigger is created as follows:
-
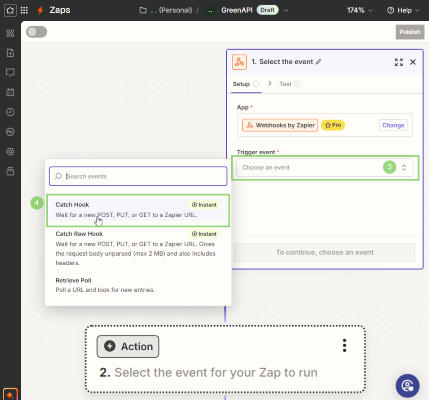
Click on the trigger selection block

-
Select "WebHooks by Zapier" as the Zap script trigger in the new window

-
Set event type to "Catch Hook"
<center>{.framed width="450"}</center> -
Move to the "Test" tab by double-clicking the "Continue" button
-
Copy the link from the "Webhook URL" field

-
Paste this link into the "Notification Sending Address (URL)" field on the instance page

-
Wait a few minutes for the settings to apply. Then send a message to the number that is linked to the instance
-
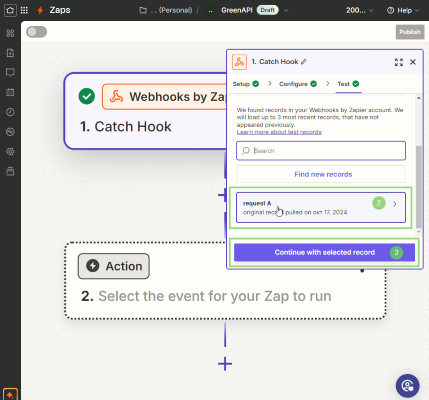
Click on the "Test Trigger" button and select the query that appears
<center>{.framed width="450"}</center>
4. Launch and test the echo bot#
After setting up the incoming notifications, create an action that will reply to the the user with the same text. The sendMessage method and the received data from the test notification will help with this.
-
Firstly, create an action with the "WebHooks by Zapier" app


-
Select POST request type

-
Specify URL as described in the documentation
{{apiUrl}}/waInstance{{idInstance}}/sendMessage/{{apiTokenInstance}}:apiUrl- API host linkidInstance- instance unique numberapiTokenInstance- instance access key


-
Method sendMessage has a payload type of
JSON, select it in thePayload Typefield. -
Two fields in the request body must be filled in to send a message:
messageandchatId. Firstly, fill in thechatIdfield, which specifies the recipient's number. In our case, this number will be the sender's number. We take it from theSender Data Chat Idfield of the incoming notification.
-
The
messagefield specifies the message for the recipient. Copy the text of the incoming message from theMessage Data Text Message Data Text Messagefield.

-
You may test the method by clicking the Test Step button on the Test tab.

After setting up your incoming notifications and creating an action, launch the echo bot by clicking the "Publish" button in the last step of your automation, or by clicking the button at the top of the screen.


Now your Zap is in action and you can communicate with the echo bot in WhatsApp. To check the bot's functionality, try sending it a message in the chat, and it will respond in kind.

How to filter incoming messages?#
Sometimes you need to filter incoming messages from the sender so that automation is triggered only under certain conditions. Let's see how this can be implemented in Zapier using the example of filtering text by the trigger word !green-bot, which should be at the beginning of the message.
- Let's create a "Filter" module between the existing modules by clicking on the plus icon between them


- In the first field of the opened dialog box select the text of the incoming message from the first module

- Select the
(Text) Starts withcondition, to check the text for a trigger word at the beginning of the text

- Write the trigger word
!green-botin the third field

After the steps above, the automation will only execute if there is a !green-bot at the beginning of the message