Setting up Make and WhatsApp integration#
The Green-API platform has its own application on Make .
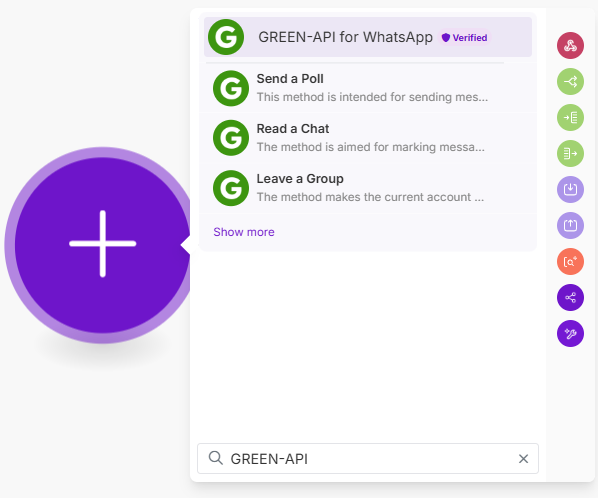
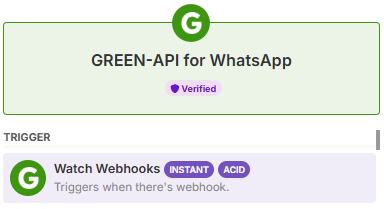
To use it, just find the GREEN-API for Whatsapp module on the scenario page:
- Open or create a scenario
- Click
+ - Enter
GREEN-APIin the search bar
Setup procedure integrations:
- Setting up the GREEN-API application
- Creating a scenario
- Setting up receiving incoming messages
- Setting up an action
- Examples of using the GREEN-API application
1. Setting up the Green-API application#
To use the GREEN-API application, you need to get a registration token and an instance ID in the console.
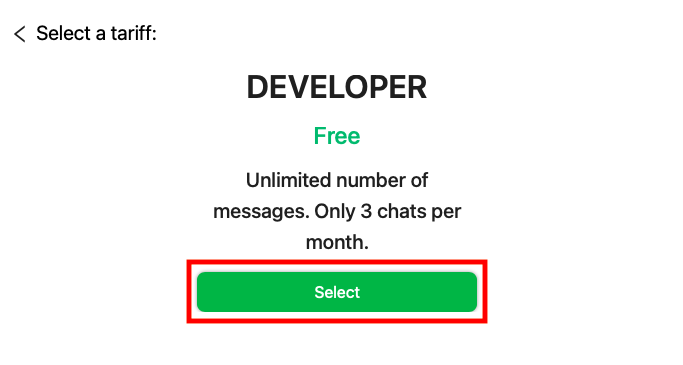
For testing, we recommend using the free developer plan.
- Log in or register an account in GREEN-API
-
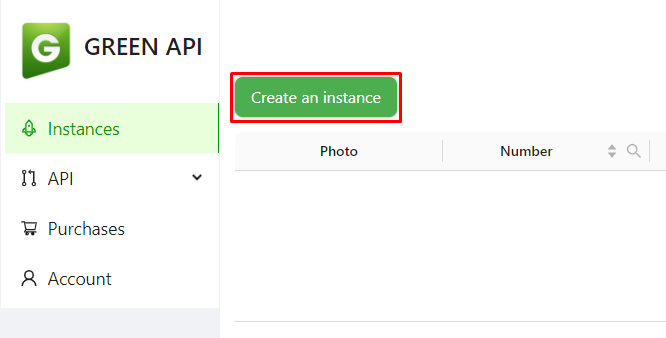
Create an instance on the free "Developer" plan.
To do this, in the console click theCreate instancebutton and select a plan.
-
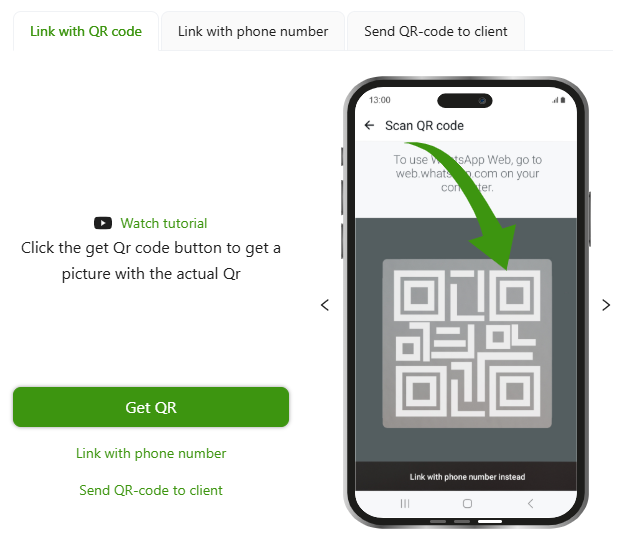
Authorize the instance. To do this:
- You can scan the QR code on the instance setup page.
In the WhatsApp or WhatsApp Business mobile app, sign in to your linked devices and scan the QR code you received.
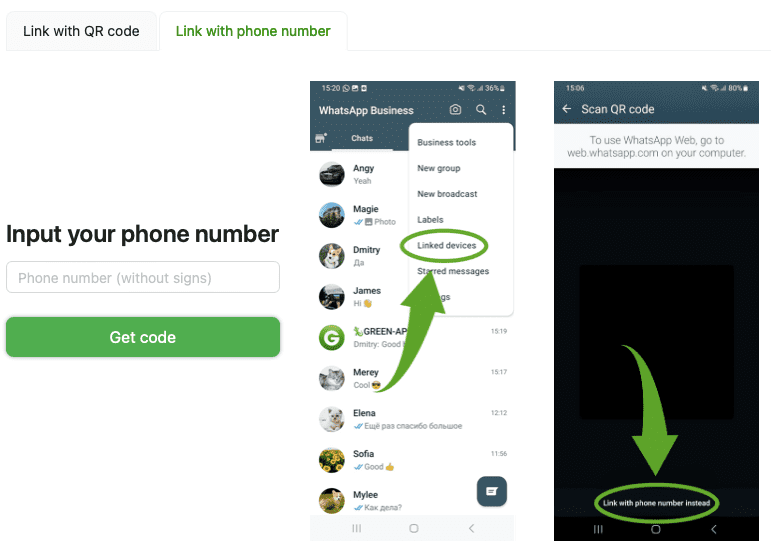
- Or request a six-digit authorization code to bind by phone number.
In the WhatsApp or WhatsApp Business mobile app, sign in to your linked devices and clickLikn with phone number.
After successful authorization, the instance should receive the
Authorizedstatus. You can check the instance status using theGetStateInstancemethod - You can scan the QR code on the instance setup page.
-
Copy the
idInstanceandapiTokenInstancevalues for working with Make scripts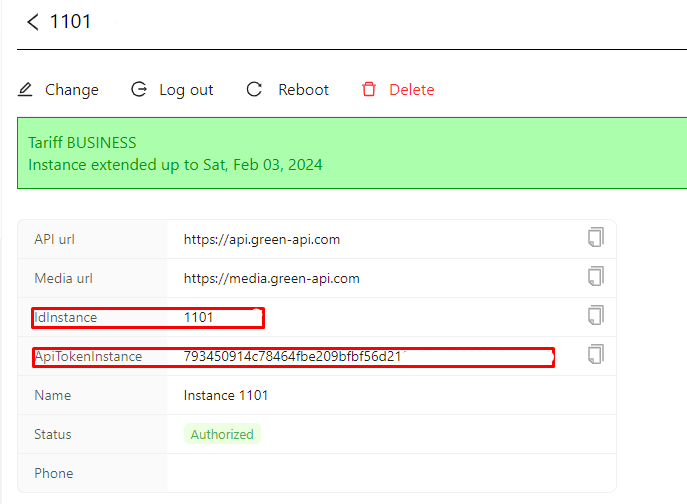
2. Creating a scenario#
A Scenario is an automated process created in Make. Each scenario consists of a trigger and an action. When a trigger is fired, Make automatically performs an action.
Scenario templates
You can create a scenario according to the instructions below or use our ready-made templates.
Steps to create a scenario:
- Log in or register an account in Make
-
Click the
Scenariosbutton in the sidebar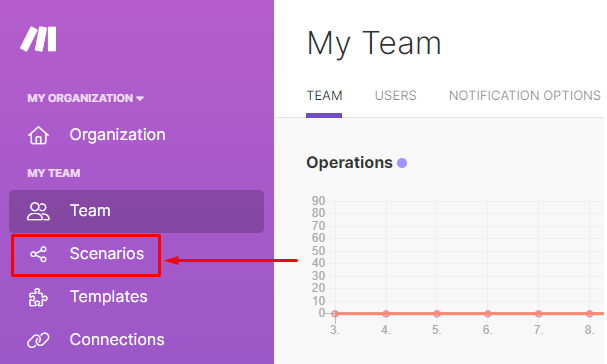
-
On the scenarios page, click
Create a new scenarioto create a new scenario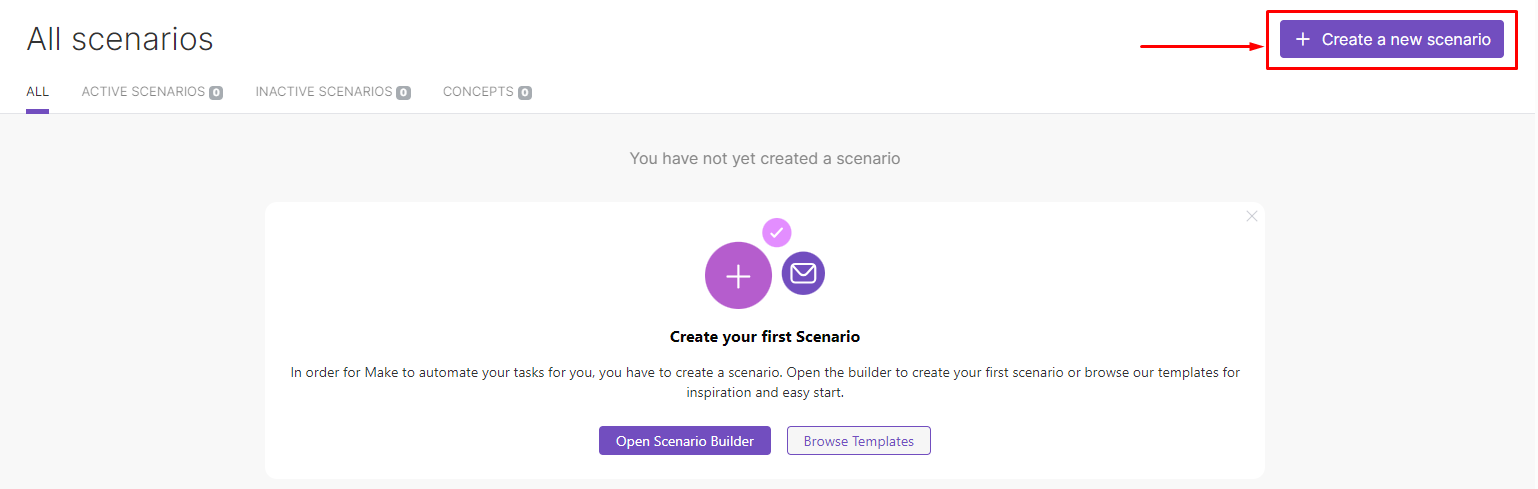
-
Scenario successfully created!
After creating the scenario, a plus sign (adding a module) will appear on the Make page.
3. Setting up incoming messages#
To receive messages in Make, you need to set up a trigger.
Trigger is an event that activates your scenario. For example, it could be a new message in WhatsApp, a new entry in Google Sheets, or something else.
Instance settings
When using the Watch Incoming Webhooks trigger, instance setup: is automatically applied:
"webhookUrl": "https://hook.eu2.make.com/xxxxxxxxxxxxxxxxxxxx",
"incomingWebhook": "yes"
Procedure for Configuring the Trigger:
- Create a new scenario
-
Click on the
+sign, in the list of applications find GREEN-API for WhatsApp -
Select the Watch Incoming Webhooks trigger at the top of the list
Receive webhooks about outgoing messages
To receive webhooks not only about incoming messages, but also about outgoing messages, use the Watch All Messages Webhooks module
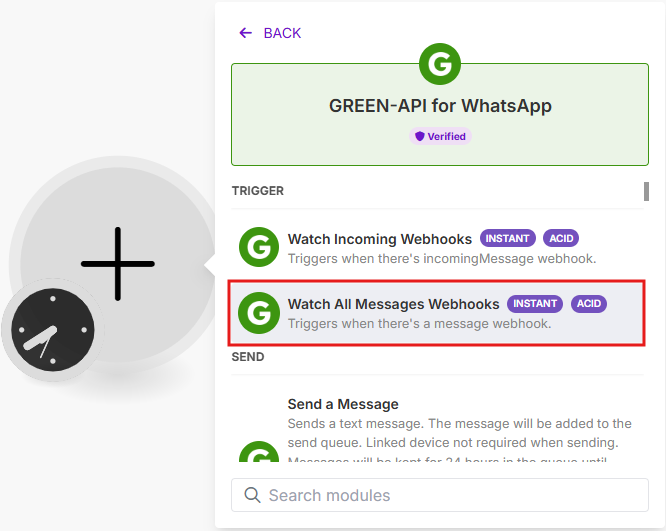
In the webhook settings, specify which webhooks you want to receive:
Select All- receive all available message webhooksincomingWebhook- receive webhooks about incoming messagesoutgoingMessageWebhook- receive webhooks about messages sent from phoneoutgoingAPIMessageWebhook- receive webhooks about messages sent via API

-
Click on the added module to open its settings
-
Click
Create a webhookto add a webhook
-
Click
Create a connectionto add a connection to the instance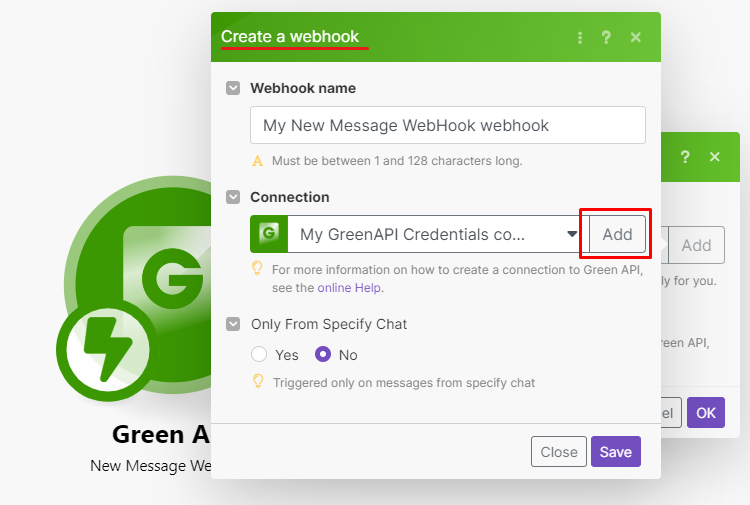
- Specify the values of your
idInstanceandapiTokenInstance
(The script will receive messages from the number linked to this instance)
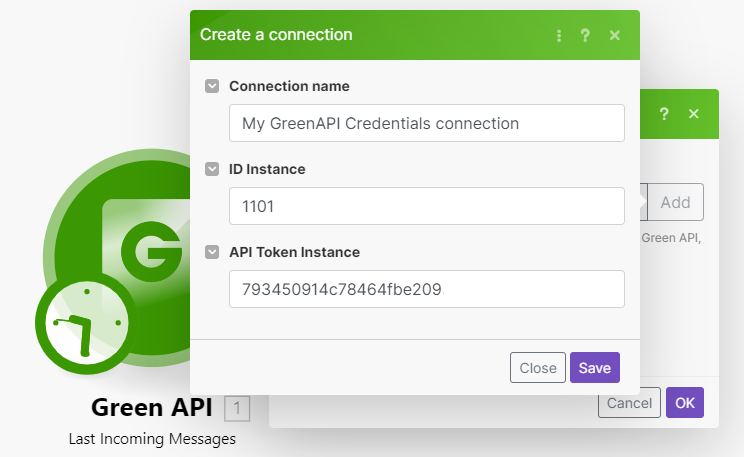
The Connection name field can be used to name the instance being added (for example, "work number" or "sales").
This will allow you to easily find the required account in the list of available integrations when creating. - Specify the values of your
Filter messages by sender number
By default, the script activates when a message is received from any number.
To run the script when a message is received from a specific number (or several specific numbers), use the chatIds parameter.
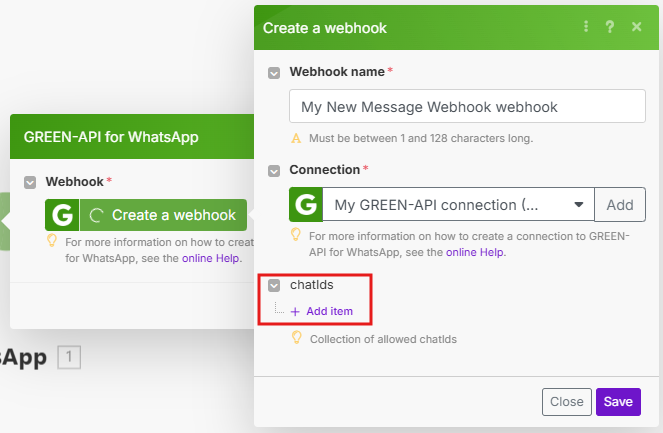
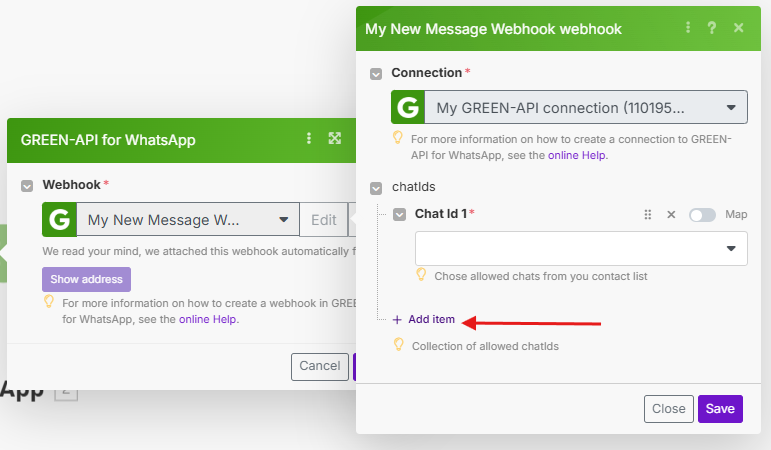
-
The number can be selected from the contact list by clicking on the drop-down list icon:
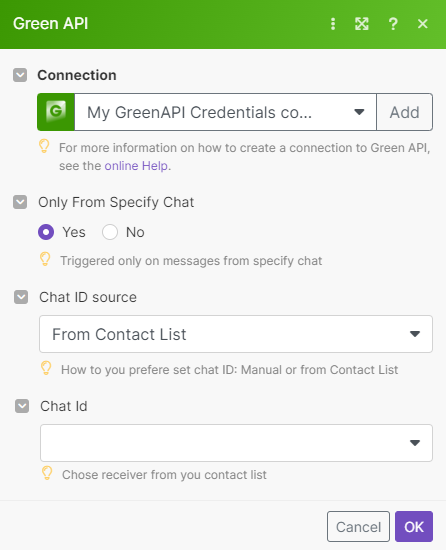
-
The number can be added manually by entering it in the
ChatIdfield:
When filling in the number manually, enter it in international format + postfix c@us - phoneNumber@c.us.
For example: 79876543210@c.us.
To add multiple numbers, add the required number of fields by clicking Add item
- Click
Saveto save your settings
- Test by clicking
Run once.
If the selected chat has incoming messages and the test is successful, click the magnifer to see what fields will be available when configuring the action.

Done! The trigger is set up, ready to use!
4. Setting up the action#
To send messages, you need to set up an action in Make.
The action needs to be set up after setting up the trigger so that messages are sent automatically.
You can also set up the action alone, without the trigger. But in this case, the script will be runned manually.
Available actions#
All actions repeat GREEN-API methods.
Methods for sending messages:
- Send a Message - sending a text message.
- Send a File by Url - send a file by URL.
- Send a File by Upload - send a file.
- Upload a File - upload a file to cloud storage.
- Send a Contact - send a contact card.
- Send a Location Message - sending a geolocation.
- Send a Poll - sending a poll.
- Forward Messages - forwarding messages to another chat.
Concise descriptions of the methods
-
Journal methods:
- Get Chat History - get the message history of the selected chat
- Get Message - get the selected message from the chat
- Get Last Outgoing Messages - get the history of messages sent from the account
- Get Last Incoming Messages - get the history of messages received on the account
-
Methods for working with groups:
- Create a Group - creating a group chat
- Update a Group Name - changing the name of a group chat
- Set a Group Picture - setting a group avatar
- Get a Group Data - getting group chat data
- Add a Group Participant - adding participant in a group chat
- Remove a Group Participant - remove a participant from a group chat
- Leave a group - leave a group chat
- Set a Group Admin - assign a group chat participant as an administrator
- Remove an Admin - deprive a participant of group chat administration rights
-
Methods for working with queues:
- Show a Messages Queue - get a list of messages in the queue for sending
- Clear a Messages Queue - clear the message queue for sending
-
Methods for working with statuses:
- Send a Text Status - send a text status
- Send a Voice Status - send a voice status
- Send a Media Status - send a media (image or video) status
- Delete a status - delete status
-
Service:
- Check Whatsapp - check if a WhatsApp account is available on a phone number
- Get an Avatar - get the avatar of a correspondent or group chat
- Get the Contacts - get a list of contacts for the current account
- Get a Contact Info - get contact information
- Delete a message - delete a message from a chat
- Edit a message - edit a message
- Archive a Chat - move a chat to an archive
- Unarchive a Chat - return a chat from an archive
- Set a Disappearing Chat - set a disappearing messages in the chat
- Read a chat - mark a message / chat as read
-
Settings:
- Get the Settings - get current instance settings
- Set the Settings - set instance settings
- Set a Profile Picture - set account avatar
- Get Wa Settings - get current account settings
-
Receiving:
- Download a File - downloading received and sent files
Sending a message#
To add an action, click on the semicircle next to the trigger. A circle with a plus sign will appear (adding a module).

-
Select an application to perform the action.
To do this, find GREEN-API for WhatsApp in the list of applications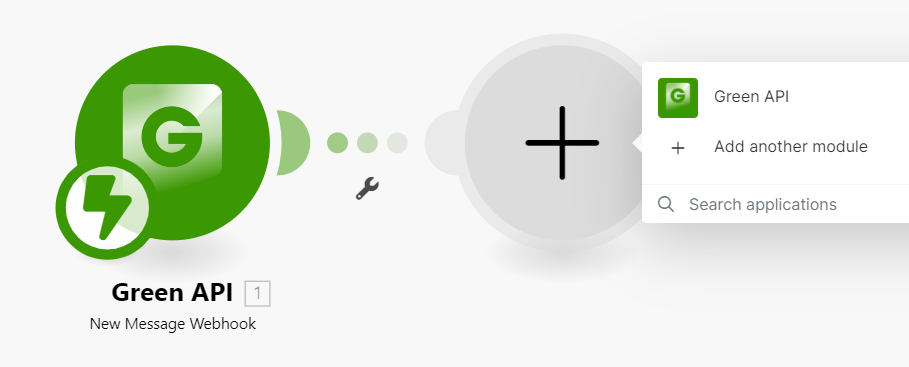
-
Select one of the methods for sending a message.
For example, theSend a Messagemethod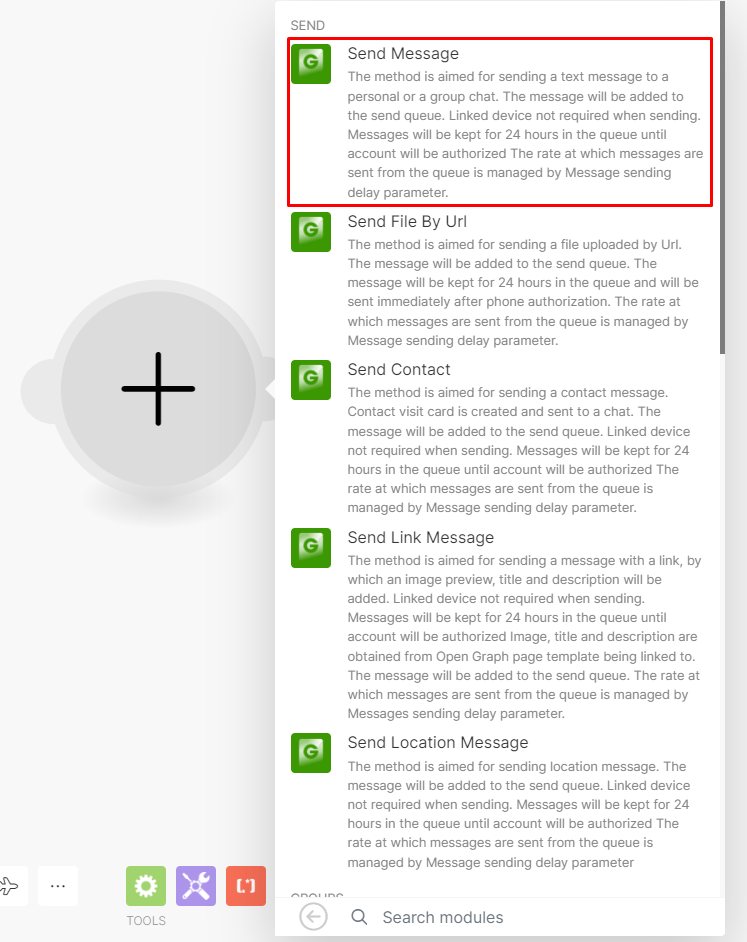
-
From the
Connectionlist, select a ready-made connection or add a new connection by clicking theaddbutton.When adding a new connection, specify your instance values
idInstanceandapiTokenInstanceThen click
Saveto save.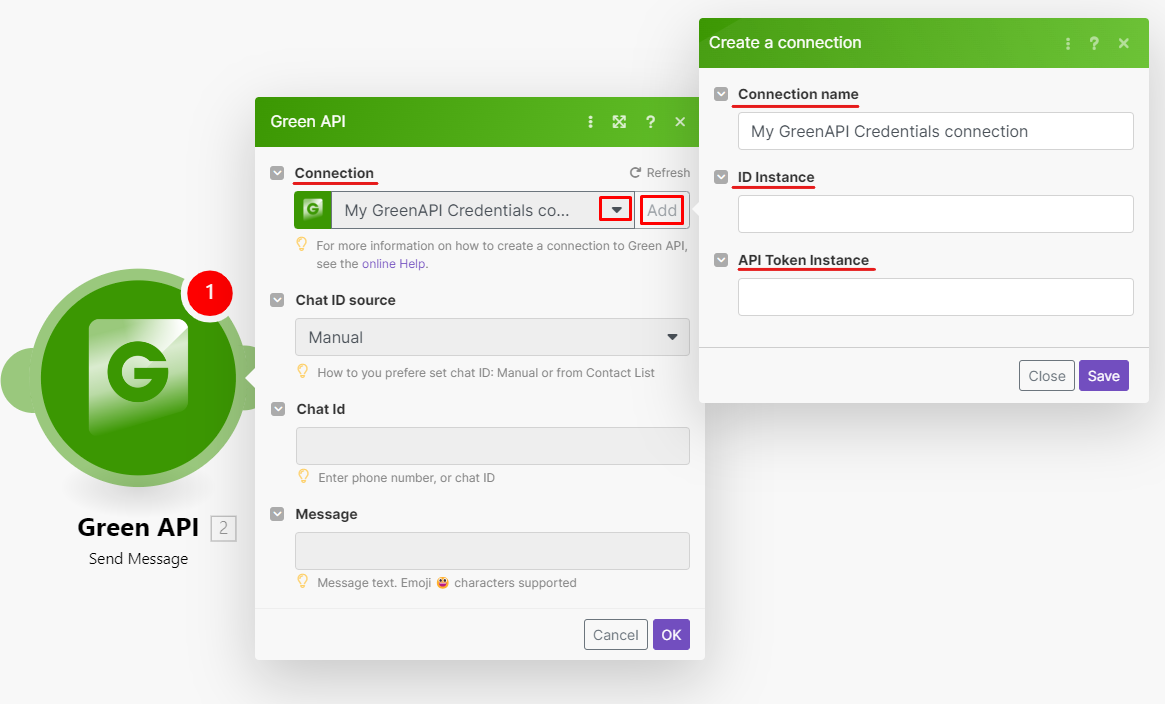
-
In the
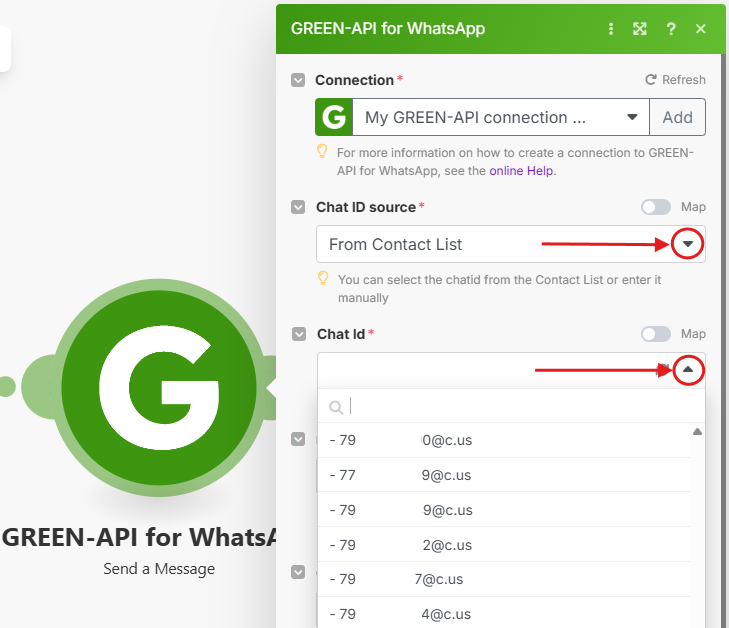
Chat Idfield, you can specify either a constant number to which messages will be sent when the script is launched, or set a variable to send a reply message to the number that wrote to your account.To select a constant number:
Select a convenient option for entering the chat number in the
Chat ID sourceparameter: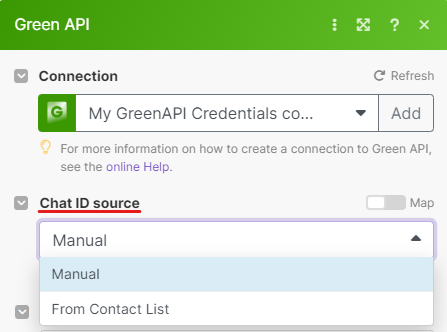
-
Manualoption - enter the number manuallyWhen filling in the number manually, you must enter it in the international format + postfix
c@us-phoneNumber@c.us.For example: 79876543210@c.us
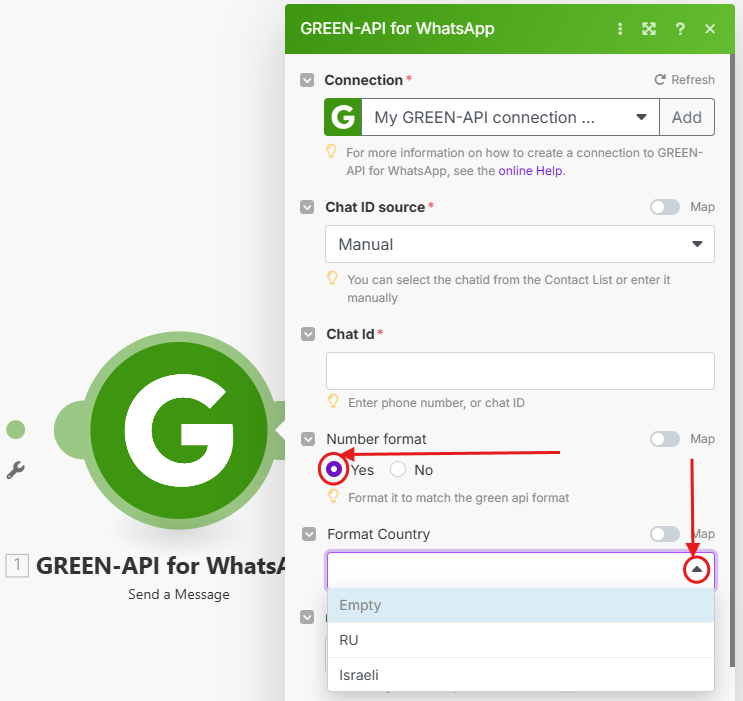
Automatic number formatting
Automatic number formatting is available for numbers in the Russian Federation, Kazakhstan* and Israel.
To enable, select yes in the Number format parameter and select Format Country. The parameter automatically adds @c.us to the phone number
*Kazakhstan numbers are formatted similarly to Russian numbers
-
From Contact Listoption - select a number from the contact listWhen selecting a number from the contact list, click on the drop-down list icon on the right and select the desired phone number.
The number is formatted automatically.
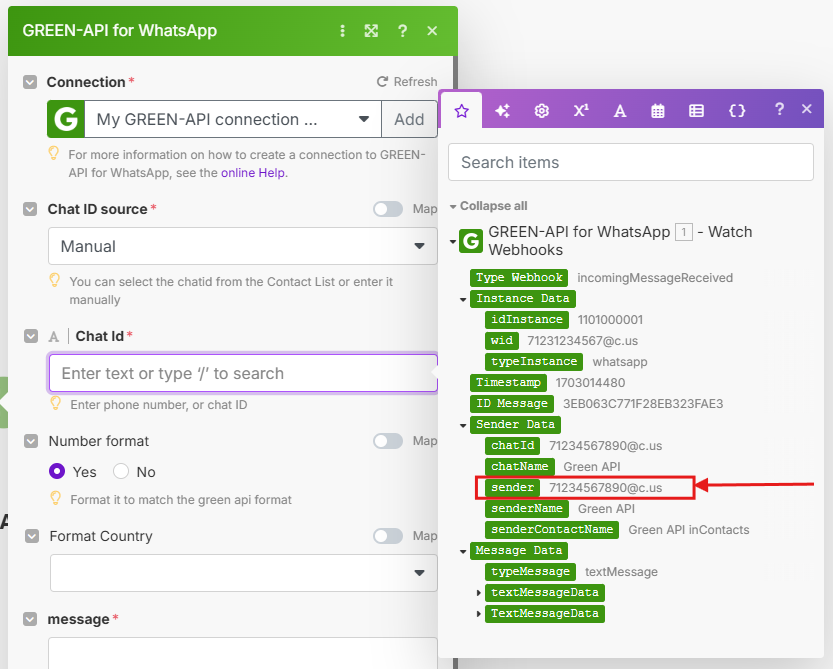
To send a message to a number that wrote to your account:
- Click on the
Chat Idinput field. - A window will open on the right with data received via the trigger.
- Specify the
sendervariable from thesenderDataobject as theChat Id.The number is formatted automatically.
-
-
Enter the text of the message in the
messagefield.
You can specify a generic text or form it from the variables received in the notification trigger.
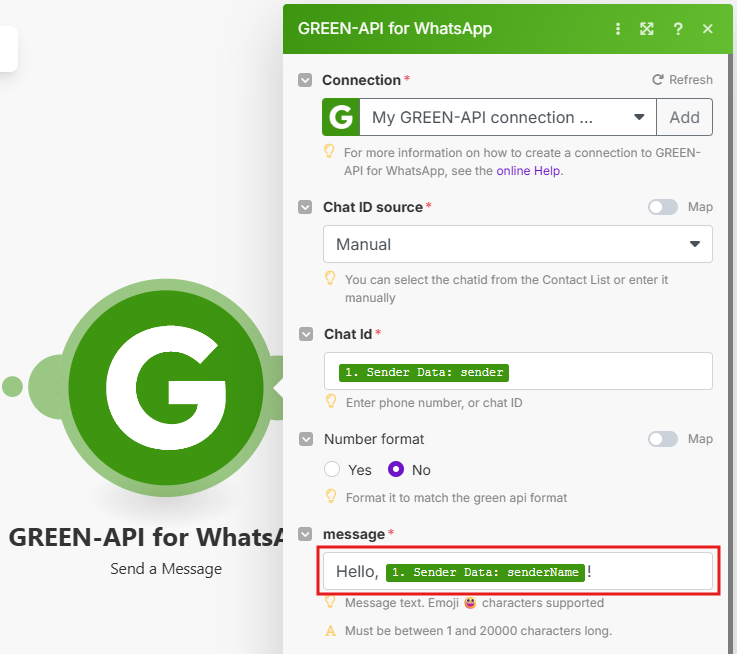
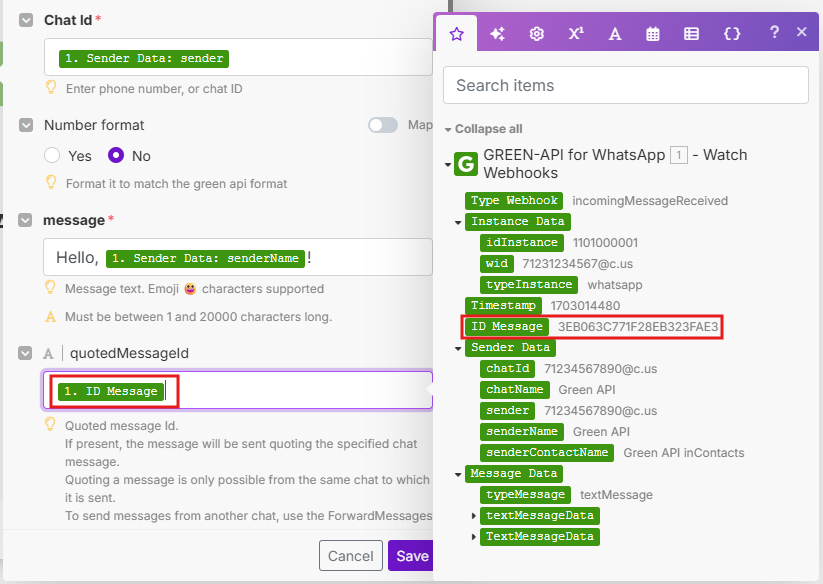
How to quote an incoming message in a response?
To add a quote in the message you send, fill in the quotedMessageId field with the ID Message variable
- Click
Saveto save the values.
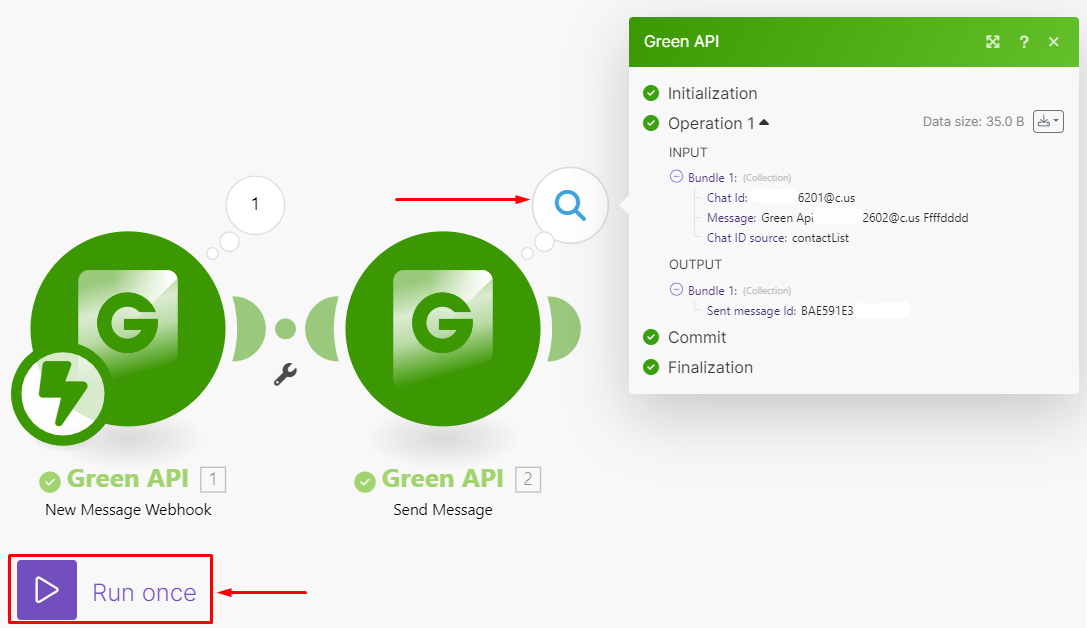
- Run a test by clicking the
Run oncebutton.
If the test is successful, click themagniferto see the action result details.
Done! The action is configured, ready to use!
GREEN-API Application Usage Examples#
How to make messaging between WhatsApp and Slack
How to Set Up Messaging Between WhatsApp and Discord
Outdated application version#
Link to install the application.
If an error occurs when installing the application via the specified links in Make, we recommend that you specify the subdomain in the link where you logged in to the site.
The availability of the site via the link depends on the subdomain.
Examples of available domains: eu1, eu2, us1, us2.

Setting up the application:
- Log in or register an account in Make
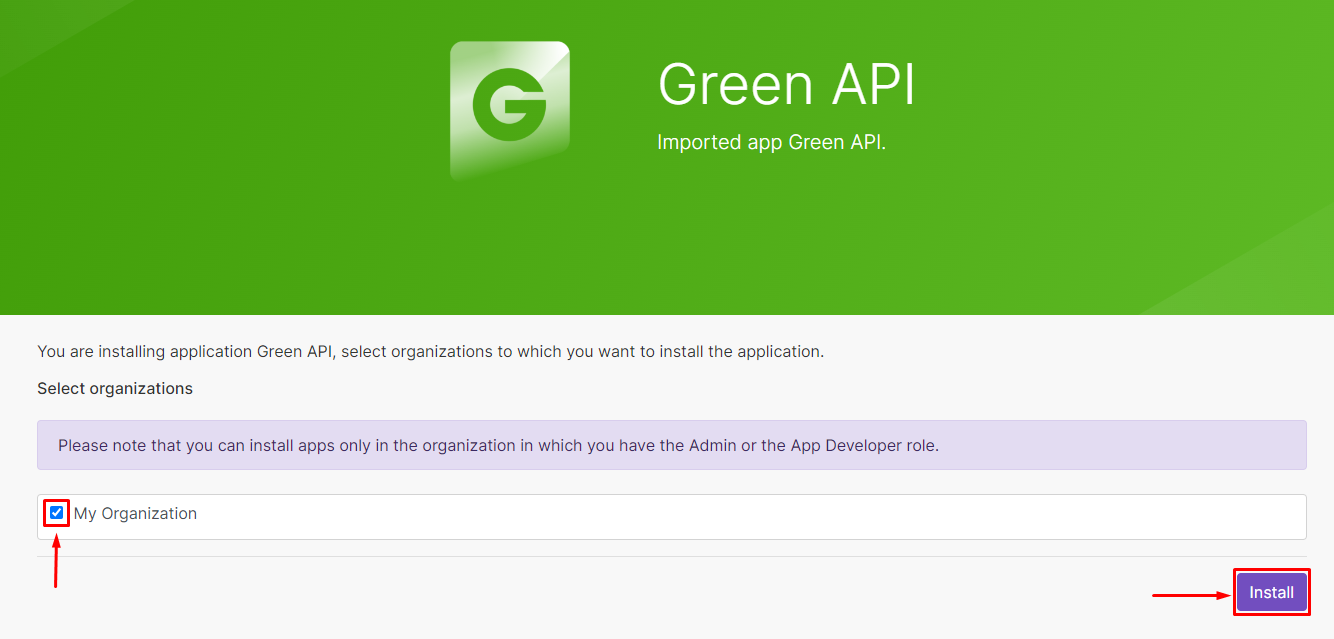
- Install the Green-API application in Make from link
- Click the
Installbutton

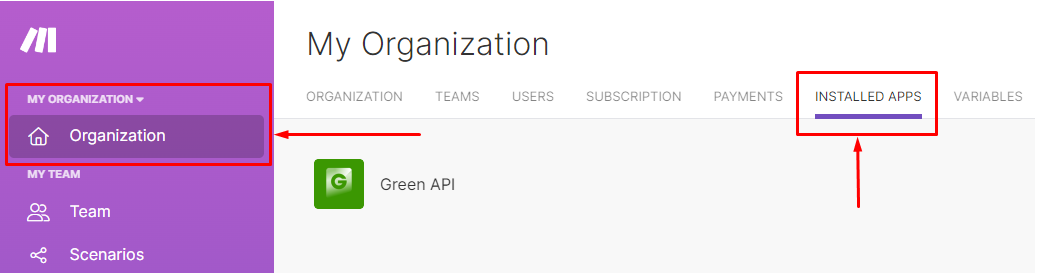
- Select the organization to which the Green-API application will be installed and click the
Installbutton
- On the
Installed Appspage, you can check the availability of the application in your organization